 NERDHOME
In the audio pre-wire post I concluded with a description of how 25 wires from the home audio systems were brought to the head end and left accessible through a single 2-gang junction box. Although It is likely acceptable to just pull the wires out the hole in the wall (they'll certainly fit) if you've been following along this far, you'd realize that doesn't really match the level of neatness and organization we've done with the rest of the wiring so far.

Naturally, the answer seems to be a patch panel. I really do seem to have an unhealthy fascination with these things, but they are very neat and organized, and if you ever pull all of your equipment out, you can leave behind a nice panel of terminals interfacing with the wiring of the home. This is a bit more challenging than the Cat6 and RG6 patch panels as there is no enclosure or other infrastucture, so I'll have to be a bit more hands-on here.
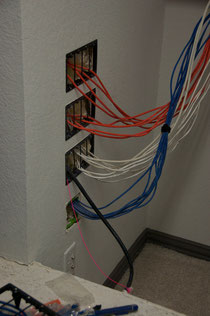
For reference, here's a photo of what the wire looked like before the drywall went up. The first thing I wanted to do was unscrew the junction box cover and extract all of the wires. This was much easier said than done. It looks straightforward given this photo, but in an effort to soundproof the media room, the builder insulated this wall. That insulation, combined with that white tape around the bundle made it very difficult indeed to remove the wire bundle, but eventually it came out. Having taken these photos was incredibly valuable though, just for understanding what I was dealing with. I can't recommend enough how important it is to take these photos before the drywall goes up.
Once I got the wire bundle out though, things got a lot easier. I headed over to www.monoprice.com and bought a bunch of binding post wall plates, as well as HDMI plates for the projector. (I believe common practice is to use a pass-through wall plate for HDMI runs, but again, I preferred the cleanliness of having an HDMI plate and felt if it didn't work I could revert to a pass through solution pretty easily.
Next I bought three 4-gang old-work low voltage boxes and carefully (wires are behind the drywall!) cut three holes and installed the boxes. Then it was a pretty simple matter of unbundling and indentifying the wires, pulling them to right spaces and connecting the binding post wall plates. For the HDMI run, I went to Monoprice and found a 25-foot flat cable that worked very well.
Finally, there was the original 2 gang space that we located the wires through. Fortunately, the keypad interface for the NuVo Grand Concerto whole-house audio system we used requrired a 2-gang space to connect the keypads, so I just installed RJ45 connectors to all of the wires and attached them to the back of the interface and screwed it in place.
With the head end all trimmed out, I just had to take care of all of the individual audio zones. This was much simpler than the head end. I just had to remove the blank 2-gang plate, pull out the 4-conductor and 2-conductor wires, and wire them together with wire nuts (as described in the Audio Pre-Wire post), attach an RJ45 connector to the Cat5 wire, plug it into the NuVo keypad and screw it back in place. As for installing the speakers, this looked to be pretty straightforward, but given the amount of overhead work, the risk of me actually being able to cut a decent circle with a drywall saw, and the relatively affordable price of having someone else do this ($30 per zone) I brought in a pro. Watching them do it, I'm certain this is easily doable by any DIYer but given that I did so much of the work myself and relied on pros so little, I don't really regret paying to have it done.


There are no comments yet.