 NERDHOME
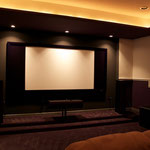
The most obvious feature of most dedicated media rooms is a large screen with an overhead projector supplying the picture. I spent a lot of time doing research on all of the things covered on this site, but the projector and screen setup HAD to be where I spent the most time. There are a lot of factors that come into play with projector and screen choice, and I wanted to make sure I was able to get the most I possibly could for the lowest price possible. One of the best resources I found was Projector Central. This site has a lot of eductional material to help you realize what projector you need or want. There's also a pretty comprehensive list of available projectors, along with their specs, and an awesome calculator to help you with projector and screen sizing and distances.

There are a lot of factors in play in picking a projector. For the most part it comes down to making sure that when the projector and screen are both mounted, that the projector can reach the screen (usually not too much of an issue, but can be if you want/need to mount the projector some distance above the top border of the screen) and making sure that the image is bright enough. The image brightness is affected by the overall light level in the room, the light output of the projector, the reflectiveness of the screen, and the size of the image that the projector will be throwing. (The Projector Central calculator is extremely helpful here).
Complicating issues somewhat was the fact that I decided that I wanted to go with a constant image height setup for watching movies that are either in 1.85 or 2.35 aspect ratio. (If these aspect ratios don't mean anything for you, then you probably don't want a CIH setup. In fact, you probably don't want to build yourself a media room period). For a typical setup, you install a screen in a 1.85 or 16x9 aspect ratio much like any typical HDTV. When watching a movie that is in the 2.35 ratio, it is shown with letterboxing on the top and bottom of the screen. In a CIH setup however, a 2.35 aspect ratio screen is installed. It is effectively the same height as the 16x9 screen, but wider. This results in basically the same size image when watching 16x9 material in either setup, but a much larger image when watching 2.35 material.
Moving to a CIH setup introduces two problems to address. The first, is that when you are watching 16x9 material, there is vertical letterboxing (or pillarboxing) on the sides of the image. This is analagous to watching older 4:3 AR programs on a modern HDTV. One one hand, this problem does not have to be addressed at all. You can just live with watching the 16x9 image being projected in the center of the screen with the sides being 'bare'. However, I felt this would be distracting and wanted it to be 'masked'. The best way to do this is an automatic masking system. This is basically an extension to the black velvet frame of the screen that can roll horizontally and cover the parts of the screen not being projected. Some systems can even mask the 2.35 AR screen all the way down to 4:3 for those few times when you're watching 4:3 material in your media room. Unfortunately, I found these systems to be prohibitively expensive for me at the time being. Instead I decided to go with an intermediate solution. I bought a screen from SMX Screens in the 2.35 aspect ratio, but it came with two velvet covered panels that insert into tracks on either side of the screen to manually mask it down to 16x9. This solution works very well and looks great in either mode, but I have found myself tiring of manually putting the masks in and out. I haven't ruled out an automatic masking setup in the future, but hopefully they will become a bit more affordable.
The second problem to address in a CIH setup is how to project into both aspect ratios. At the time of outfitting the media room, I did not know of any projectors that would project in the 2.35 AR natively (at least not in my price range). So that leaves two main methods to get a 16x9 projector to project into a 2.35 AR screen. The first is to use an external lens. In this method, the 2.35 image is first stretched vertically by the projector to fill out the entire 16x9 frame (very similar to the various 'stretch' modes used by HDTVs to fit 4:3 material to the 16x9 size). Then image is passed through a lens in front of the project that stretches the image horizontally to fill out the screen. The second is referred to as the zoom method. The zoom method is relatively straightforward, the projector simply zooms to enlarge the 2.35 image so that it fills the screen.
Each method has their advantages and disadvantages. The lens method's biggest advantages are that all of the light that your projector throws ends up on the screen, resulting in a brighter image. It also has the advantage of being able to use a wider selection of projectors. Proponents of this method also tend to say that it also uses all of your available pixels. This is a true, however since the projector is already vertically stretching the image from the disc (which was NOT using the entire vertical range of pixels) it's not like it's actually showing you more info. On the other hand, the lens method requires an expensive lens, and much like the masking issue, there is now a lens that needs to be put into and out of place. Automated 'sleds' are available, but like the masking systems, the cost is high. Also, regardless of if the sled is automatic or manual, it's going to look sort of clunky out there. Finally, this method is effectively two seperate stretches. A digital vertical stretch and a horizontal optical stretch. If they aren't both identical, the image will be distorted. The zoom method has an advantage of simplicity. If a projector has a lens memory, it's as simple as pressing a button to switch from one zoom preset to another (well, not always THAT simple, but I'll cover that in another post). The biggest disadvantages here are that your projector choice is limited to the few units with lens memory, and not all of the projector's brightness reaches the screen as what you're effectively doing is projecting the usual black letterbox bars off of the screen (in addition, it is helpful to have a combination of a projector with good black levels and very unreflective material around your screen so that this effect is not noticed). In the end, I chose the zoom method to do this, as I felt the projector I chose would still be bright enough in 2.35 mode (again, with help from the Projector Central calculator).
Using a CIH zoom setup and pushing the screen size as high as I could left not a lot of mounting flexibility for the projector. For the most part, projectors need to be facing the screen but beyond that have a surprising amount of leeway in where they are mounted beyond that with an ability to shift the image vertically and horizontally. However, if you are using the maximum vertical shift, then maximum horizontal shift can become comprimized, or less zoom may be available etc... For my setup, with a large CIH screen, the remaining possible mounting location became pretty specific. The projector needed to be close to center, and it needed to be low enough such that the center of the lens was no higher than the top of the screen. Finally to supply enough brightness, still project the full image size and facilitate both aspect ratios, the projector's distance from the screen had to be within a 14" window. (Have I mentioned the calculator at Projector Central? Also, downloading the projector's manual in advance was instrumental in some of these calculations).
Although I had done countless calculations using the projector and screen specs along with the drawings for the home, and was certain everything was going to fit, there were still things I failed to account for. If I were doing this again, I would ensure some plywood was installed behind the drywall in the area where I intended to mount the projector, which would make it easy to mount it wherever it had to go. In my case, this wasn't done, so the mount would have to attach to the joist (I didn't feel comfortable supporting the heavy projector over peoples' heads with toggle bolts). So I found a mount that was linear so I could mount it along the joist closest to center and it would adjust forward and backward so I could be the right distance away. Of course, this all assumed that the joists were running from front to back. They were not. My linear mount had to be mounted sideways. I had a 14" window that the projector had to be in, and the joists were on 16" centers. With great fortune, there was a joist within that window (and on the plus side, I was able to get the projector perfectly centered). Next time, I'd be sure to install some pieces of plywood between the joists in that part of the room.
Finally, a short note on screen material. Most manufacturers offer a selection of materials offering trade offs in viewing angle and black levels and reflectiveness. Since our screen itself was so large (105" in 16x9; 120" in 2.35), it was going to use a lot of the projector's light output. So I went with a moderately high gain screen material (1.4 gain). There are no viewing angle issues, and I find the black levels acceptable.
All in all, everything worked out well. My biggest worry through all of this was that my image just wouldn't be bright enough. However it's actually bright enough that I am running the projector in the dimmer 'eco' mode. The fact that my room has no windows is very helpful here.


There are no comments yet.